From one-off shifts to reoccurring and rotating shifts, find out how to create your first shift! Use the Site Walkthrough feature by clicking on the Start Tour button to guide you through creating a shift based on the following shift types. Otherwise, select which type of shift you would like to create and follow the below instructions:
- Create a One-off Shift
- Create a Reoccurring Shift
- Create a Rotating Shift
Create a One-off Shift
A one-off shift is a shift that only occurs once. For example, staffing for a one-off activity or event. Please read the following instructions to help you create a one-off shift.
Enter all of the basic shift information. This includes:
- Entering a shift name
- Entering the location of the shift
- Specifying whether you wish to track the shift for a particular job or event (optional). Jobs can be created by going to Company Settings > Jobs.
- Entering a shift description (optional)
- Entering the Department for this shift
- Specifying any employees you wish to restrict from showing as available on this shift (optional).
- Selecting the Shift Type you wish to create.
(*Note: Employees must be assigned a location and department to be available for shifts.)
Under Shift Type, select One-off Shift.
Enter all the shift start time, finish time and the date of the shift.
Select the type and number of roles required for the shift, as well as any skills that are required for this role and any tasks this role is required to perform.
Default employees will always be assigned to the shift. If you would like to add a default employee to the shift, select the No Default Employee button. A list of available staff will appear. Select who will work this role by clicking Assign, then set the employee as default for the role. (This field is optional)
Assign tasks and skills to the shift as opposed to a particular role. (This field is optional)
Tasks – any employee on this shift regardless of role will be able to tick these off.
Skills – select a skill that any role is able to fill for this shift.
Create a Reoccurring Shift
A reoccurring shift is when you have a shift occurring at the same time with the same employees over a certain time period. For example, a typical work week, where employees work a 9am -5pm shift each week.
Please read the following instructions to help you create a reoccurring shift.
Enter all of the basic shift information. This includes:
- Entering a shift name
- Entering the location of the shift
- Specifying whether you wish to track the shift for a particular job or event (optional). Jobs can be created by going to Company Settings > Jobs.
- Entering a shift description (optional)
- Entering the Department for this shift
- Specifying any employees you wish to restrict from showing as available on this shift (optional).
- Selecting the Shift Type you wish to create.
(*Note: Employees must be assigned a location and department to be available for shifts.)
Under Shift Type, select Reoccurring Shift.
Enter all the shift start time, finish time and the date of the shift. This includes how often the shift occurs (e.g. every week) as well as the days of the week it occurs.
Select the type and number of roles required for the shift, as well as any skills that are required for this role and any tasks this role is required to perform.
Default employees will always be assigned to the shift. If you would like to add a default employee to the shift, select the No Default Employee button. A list of available staff will appear. Select who will work this role by clicking Assign, then set the employee as default for the role. (This field is optional)
Assign tasks and skills to the shift as opposed to a particular role. (This field is optional)
Tasks – any employee on this shift regardless of role will be able to tick these off.
Skills – select a skill that any role is able to fill for this shift.
Create a Rotating Shift
A rotating shift allows you to set different roles and employees per slot (day) and create a rotating pattern. For example, a 2-slot roster will rotate every 2 days.
Example: A hospital schedule, where nurses work 4-days on, 2 days off. If you select only Monday – Friday and have a 7 slot rotation and starting on a Monday, slots 6 & 7 will occur on the following Monday & Tuesday, going back to slot 1 on the following Wednesday, it will then continue to rotate every 7 ‘working days’.
Please read the following instructions to help you create a rotating shift.
Enter all of the basic shift information. This includes:
- Entering a shift name
- Entering the location of the shift
- Specifying whether you wish to track the shift for a particular job or event (optional). Jobs can be created by going to Company Settings > Jobs.
- Entering a shift description (optional)
- Entering the Department for this shift
- Specifying any employees you wish to restrict from showing as available on this shift (optional).
- Selecting the Shift Type you wish to create.
(*Note: Employees must be assigned a location and department to be available for shifts.)
Under Shift Type, select Rotating Shift.
This includes the number of rotation slots, the days of the week this shift occurs and when this rotation will start . Review your rotation to ensure it is correct
Select the type and number of roles required for the shift, as well as any skills that are required for this role and any tasks this role is required to perform.
Default employees will always be assigned to the shift. If you would like to add a default employee to the shift, select the No Default Employee button. A list of available staff will appear. Select who will work this role by clicking Assign, then set the employee as default for the role. (This field is optional)
Assign tasks and skills to the shift as opposed to a particular role. (This field is optional)
Tasks – any employee on this shift regardless of role will be able to tick these off.
Skills – select a skill that any role is able to fill for this shift.
Create a Base Shift with Multiple Times
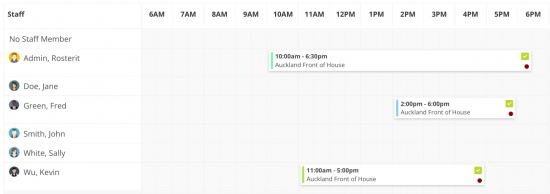
Create a single base shift with different start & end times for each role. This allows you to modify each day/role to get exactly what you need within one shift, as opposed to creating multiple shifts.
For example, a rotating roster for 7 days occurring Monday though to Sunday with a base time of 10.00 to 18.30:
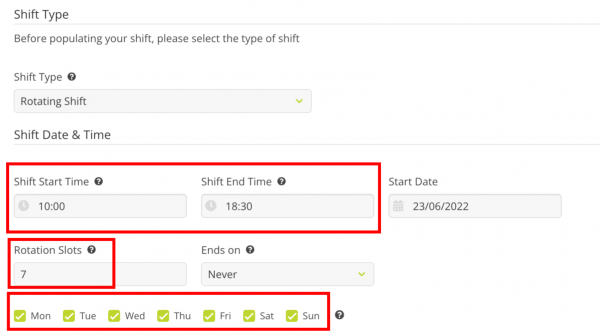
Step 2 – Add all relevant Roles, Skills & Tasks.
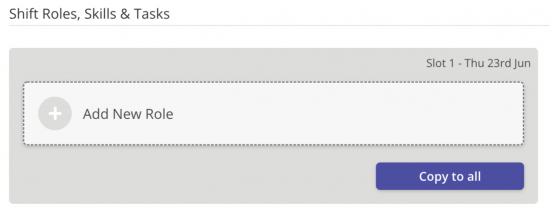
Step 3 – Edit each role that has a different start and end time to the base shift time.
To do this, simply click the ellipses (3 dots) and select Edit.

Select the start and end times you wish to set for each Role.
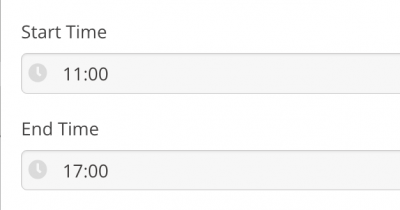
Notice how the times are now different for each Role. You can also click the Copy to All button to copy the same Role to the entire week.
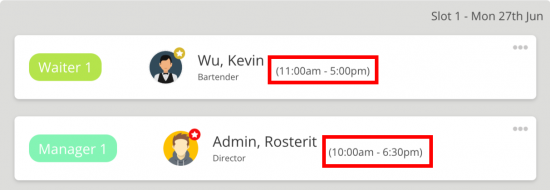
Step 4 – click Create Shift and view your roster.
Next Step: Manage Shifts
Once you’ve learned how to create a shift, find out how to manage your shifts – including updating shift details and modifying employees working a shift.
Still need help?
If you have any technical support queries or need help resolving an error, please visit our Frequently Asked Questions (FAQs) or submit a ticket for our technical support staff.
Submit a Support TicketView FAQs


