Contact Details
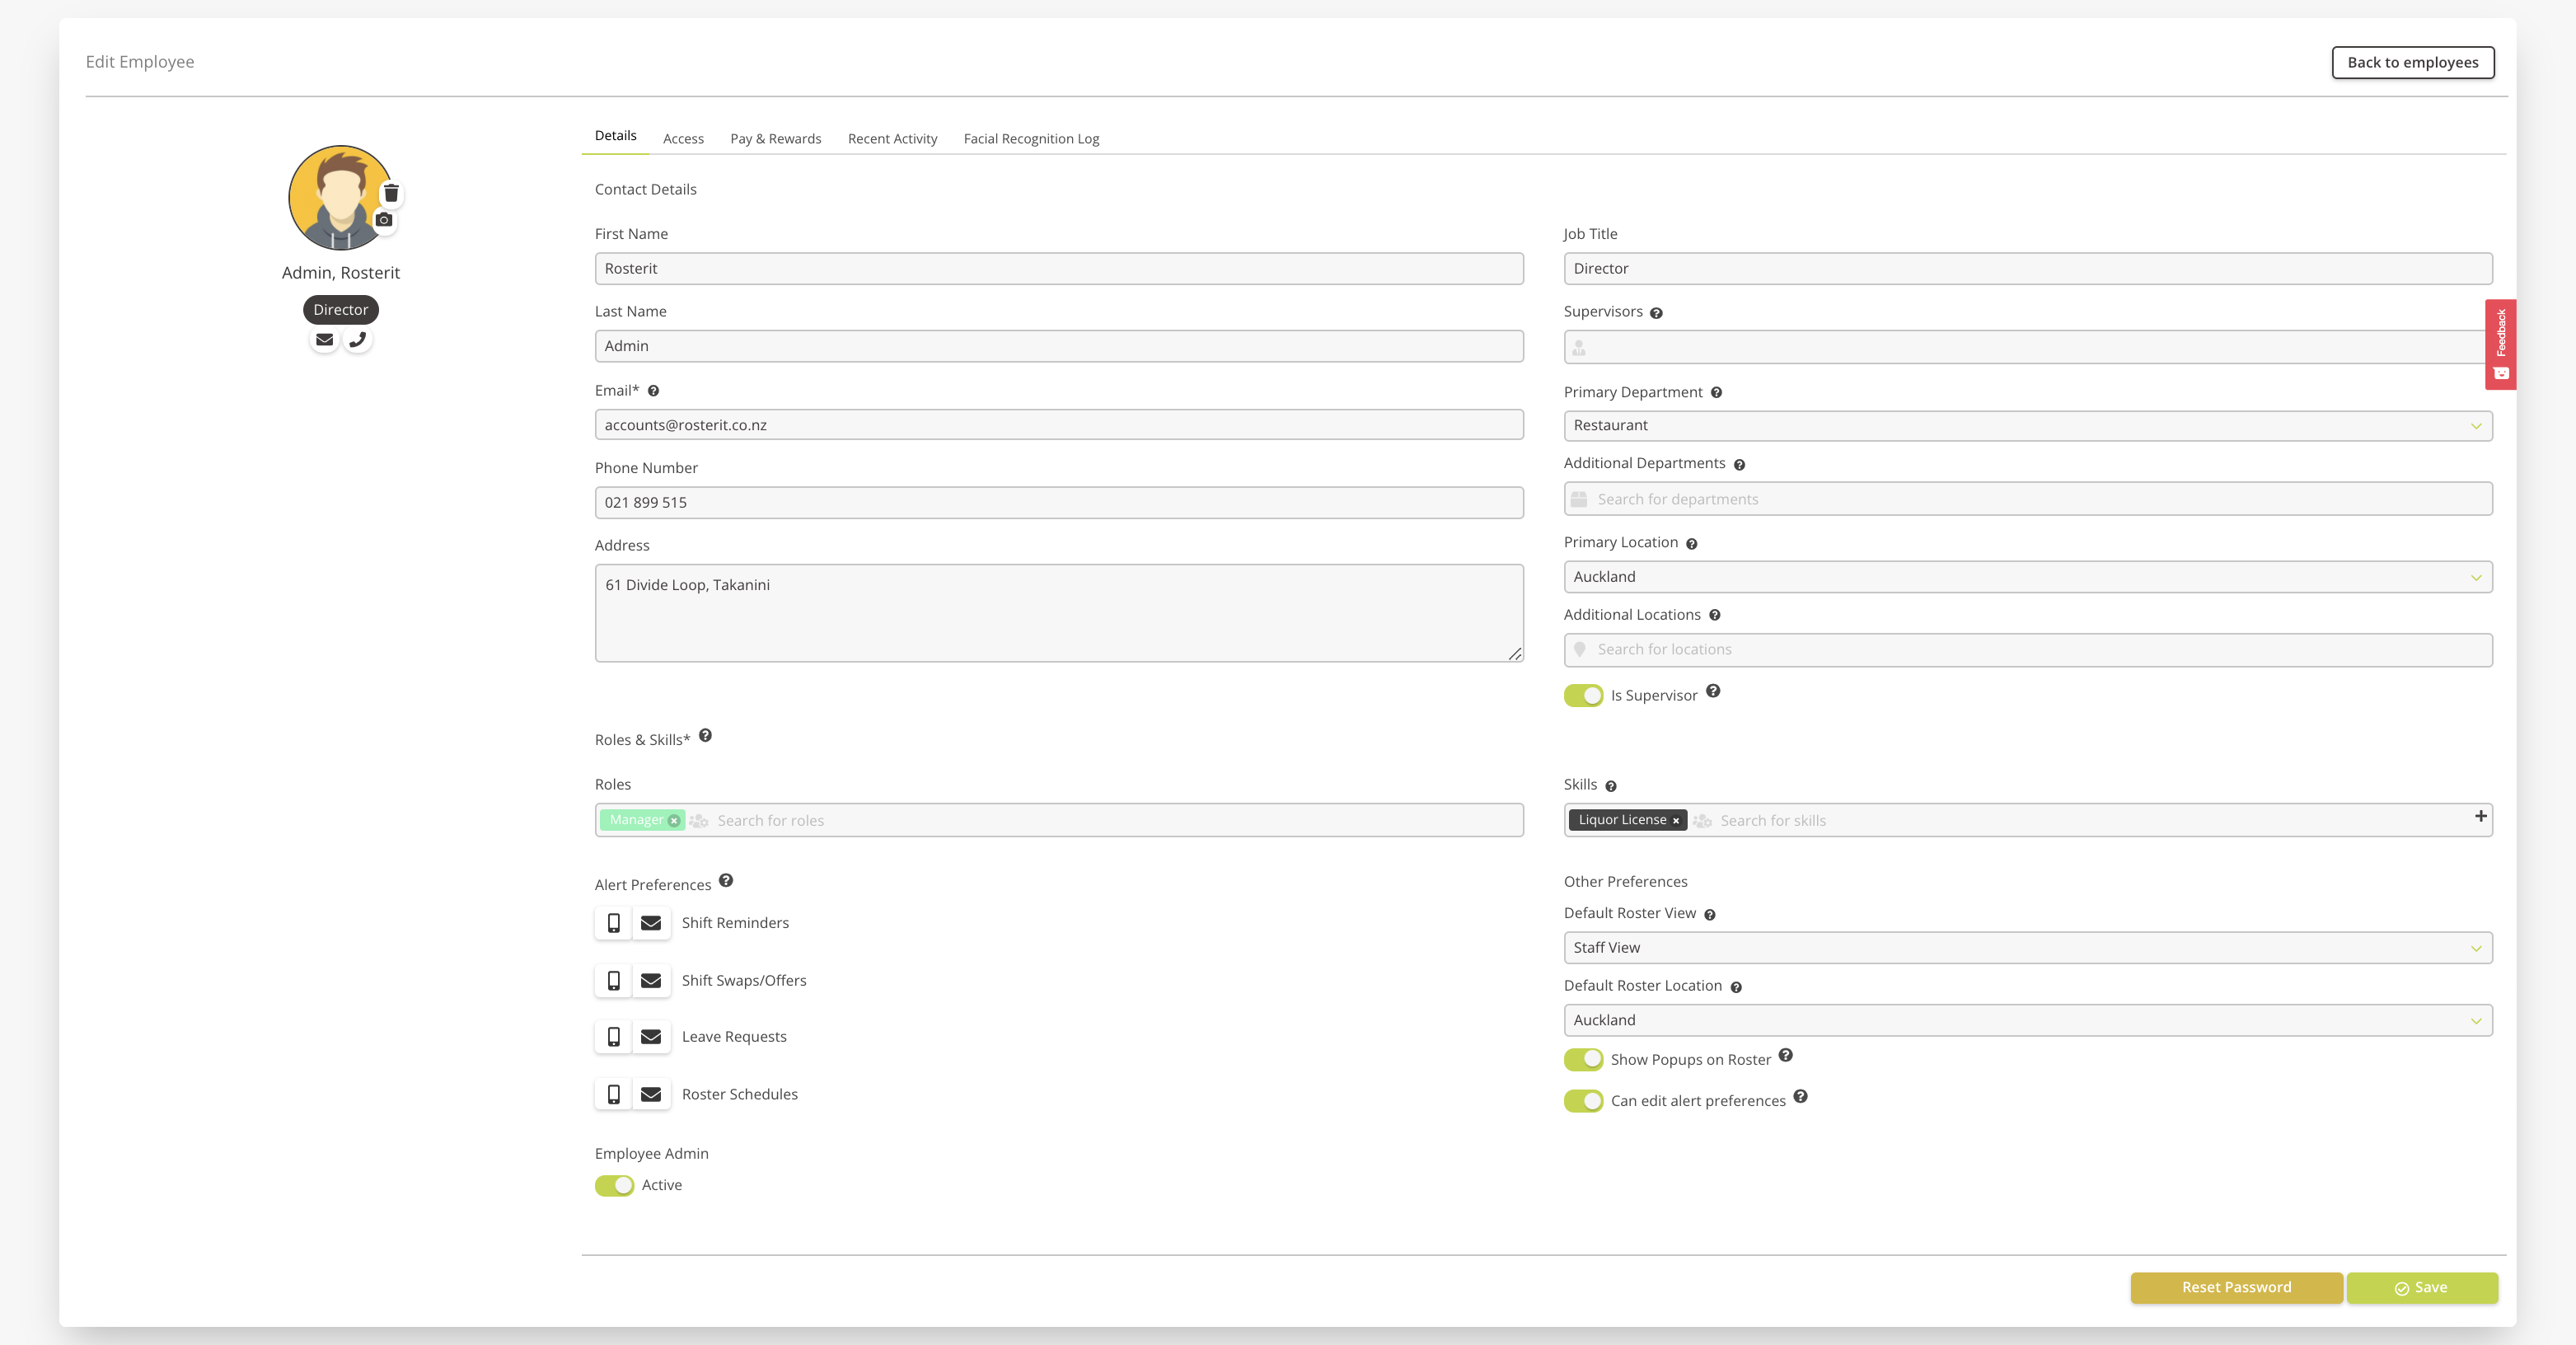
First, you’ll need to enter the employee’s basic contact details – including name, email address and phone number. All employees must have an email address to have a login to Rosterit. The employee email address is required as this is what activates an employee in the system, and is what the employee will use to login to Rosterit.
Employees will be able to edit and update their personal details by going to My Settings. Find out more by going to the Update Your Profile section.
(Note: The Primary Location and Department field must be completed in order for an employee to appear on shifts.)
- Job Title (optional) – Enter the employee’s job title.
- Select Supervisor – Select the employee’s supervisor. This is who will approve the employee’s timesheets and leave requests.
- Primary Department/Location – Select the primary department/location where the employee primarily works. This field must be completed in order for an employee to appear as available for shifts.
- Additional departments/Locations (optional) – If the employee works across different departments or locations, select any additional departments/locations here.
- Supervisor – Turn this toggle on if this employee is also a supervisor. This will allow the employee to be shown on the supervisor list.
Roles & Skills
Next, you’ll need to enter the employee’s roles & skills. Roles are mandatory, and there can be as many as required. Skills are optional, and there can also be as many as required. Learn more about Roles & Skills.
Roles – Add all of the roles or positions that the employee is capable of doing by typing in the name of the role in the search box and pressing Enter. You can select as many as required. To create a role, go to Company Settings > Roles & Skills (add link to jobs page).
Skills (optional) – Add any relevant skills that the employee has. You can select as many as required. To create a skill, go to Company Settings > Roles & Skills (add link to jobs page).
Alert Preferences
Specify the employee’s preferred communication preferences for each alert type. (*Note: The Communication Method needs to be turned on in the Company Settings page to activate employee communications. The in-app notification communication preference is activated when the employee first logs into Rosterit and allows these notifications.)
Other Preferences
Specify other preferences, including how the employee would like the roster to display, their default location, and how they would like to be communicated with.
Employee Admin – This is where you can make an employee active/inactive using the toggle to turn on/off.
Contact Details
First, you’ll need to enter the employee’s basic contact details – including name, email address and phone number.
All employees must have an email address to have a login to Rosterit. The employee email address is required as this is what activates an employee in the system, and is what the employee will use to login to Rosterit.
Employees will be able to edit and update their personal details by going to My Settings.
(Note: The Primary Location and Department field must be completed in order for an employee to appear on shifts.)
- Job Title (optional) – Enter the employee’s job title.
- Select Supervisor – Select the employee’s supervisor. This is who will approve the employee’s timesheets and leave requests.
- Primary Department/Location – Select the primary department/location where the employee primarily works. This field must be completed in order for an employee to appear as available for shifts.
- Additional departments/Locations (optional) – If the employee works across different departments or locations, select any additional departments/locations here.
- Supervisor – Turn this toggle on if this employee is also a supervisor. This will allow the employee to be shown on the supervisor list.
Roles & Skills
Next, you’ll need to enter the employee’s roles & skills. Roles are mandatory, and there can be as many as required. Skills are optional, and there can also be as many as required. Learn more about Roles & Skills.
Roles – Add all of the roles or positions that the employee is capable of doing by typing in the name of the role in the search box and pressing Enter. You can select as many as required. To create a role, go to Company Settings > Roles & Skills (add link to jobs page).
Skills (optional) – Add any relevant skills that the employee has. You can select as many as required. To create a skill, go to Company Settings > Roles & Skills (add link to jobs page).
Alert Preferences
Specify the employee’s preferred communication preferences for each alert type. (*Note: The Communication Method needs to be turned on in the Company Settings page to activate employee communications. The in-app notification communication preference is activated when the employee first logs into Rosterit and allows these notifications.)
Other Preferences
Specify other preferences, including how the employee would like the roster to display, their default location, and how they would like to be communicated with.
Employee Admin – This is where you can make an employee active/inactive using the toggle to turn on/off.
*This feature is for the Time & Attendance module only.
Lastly, you’ll want to enter the employee’s pay and rewards. This section only applies to those on the Time & Attendance Plan.
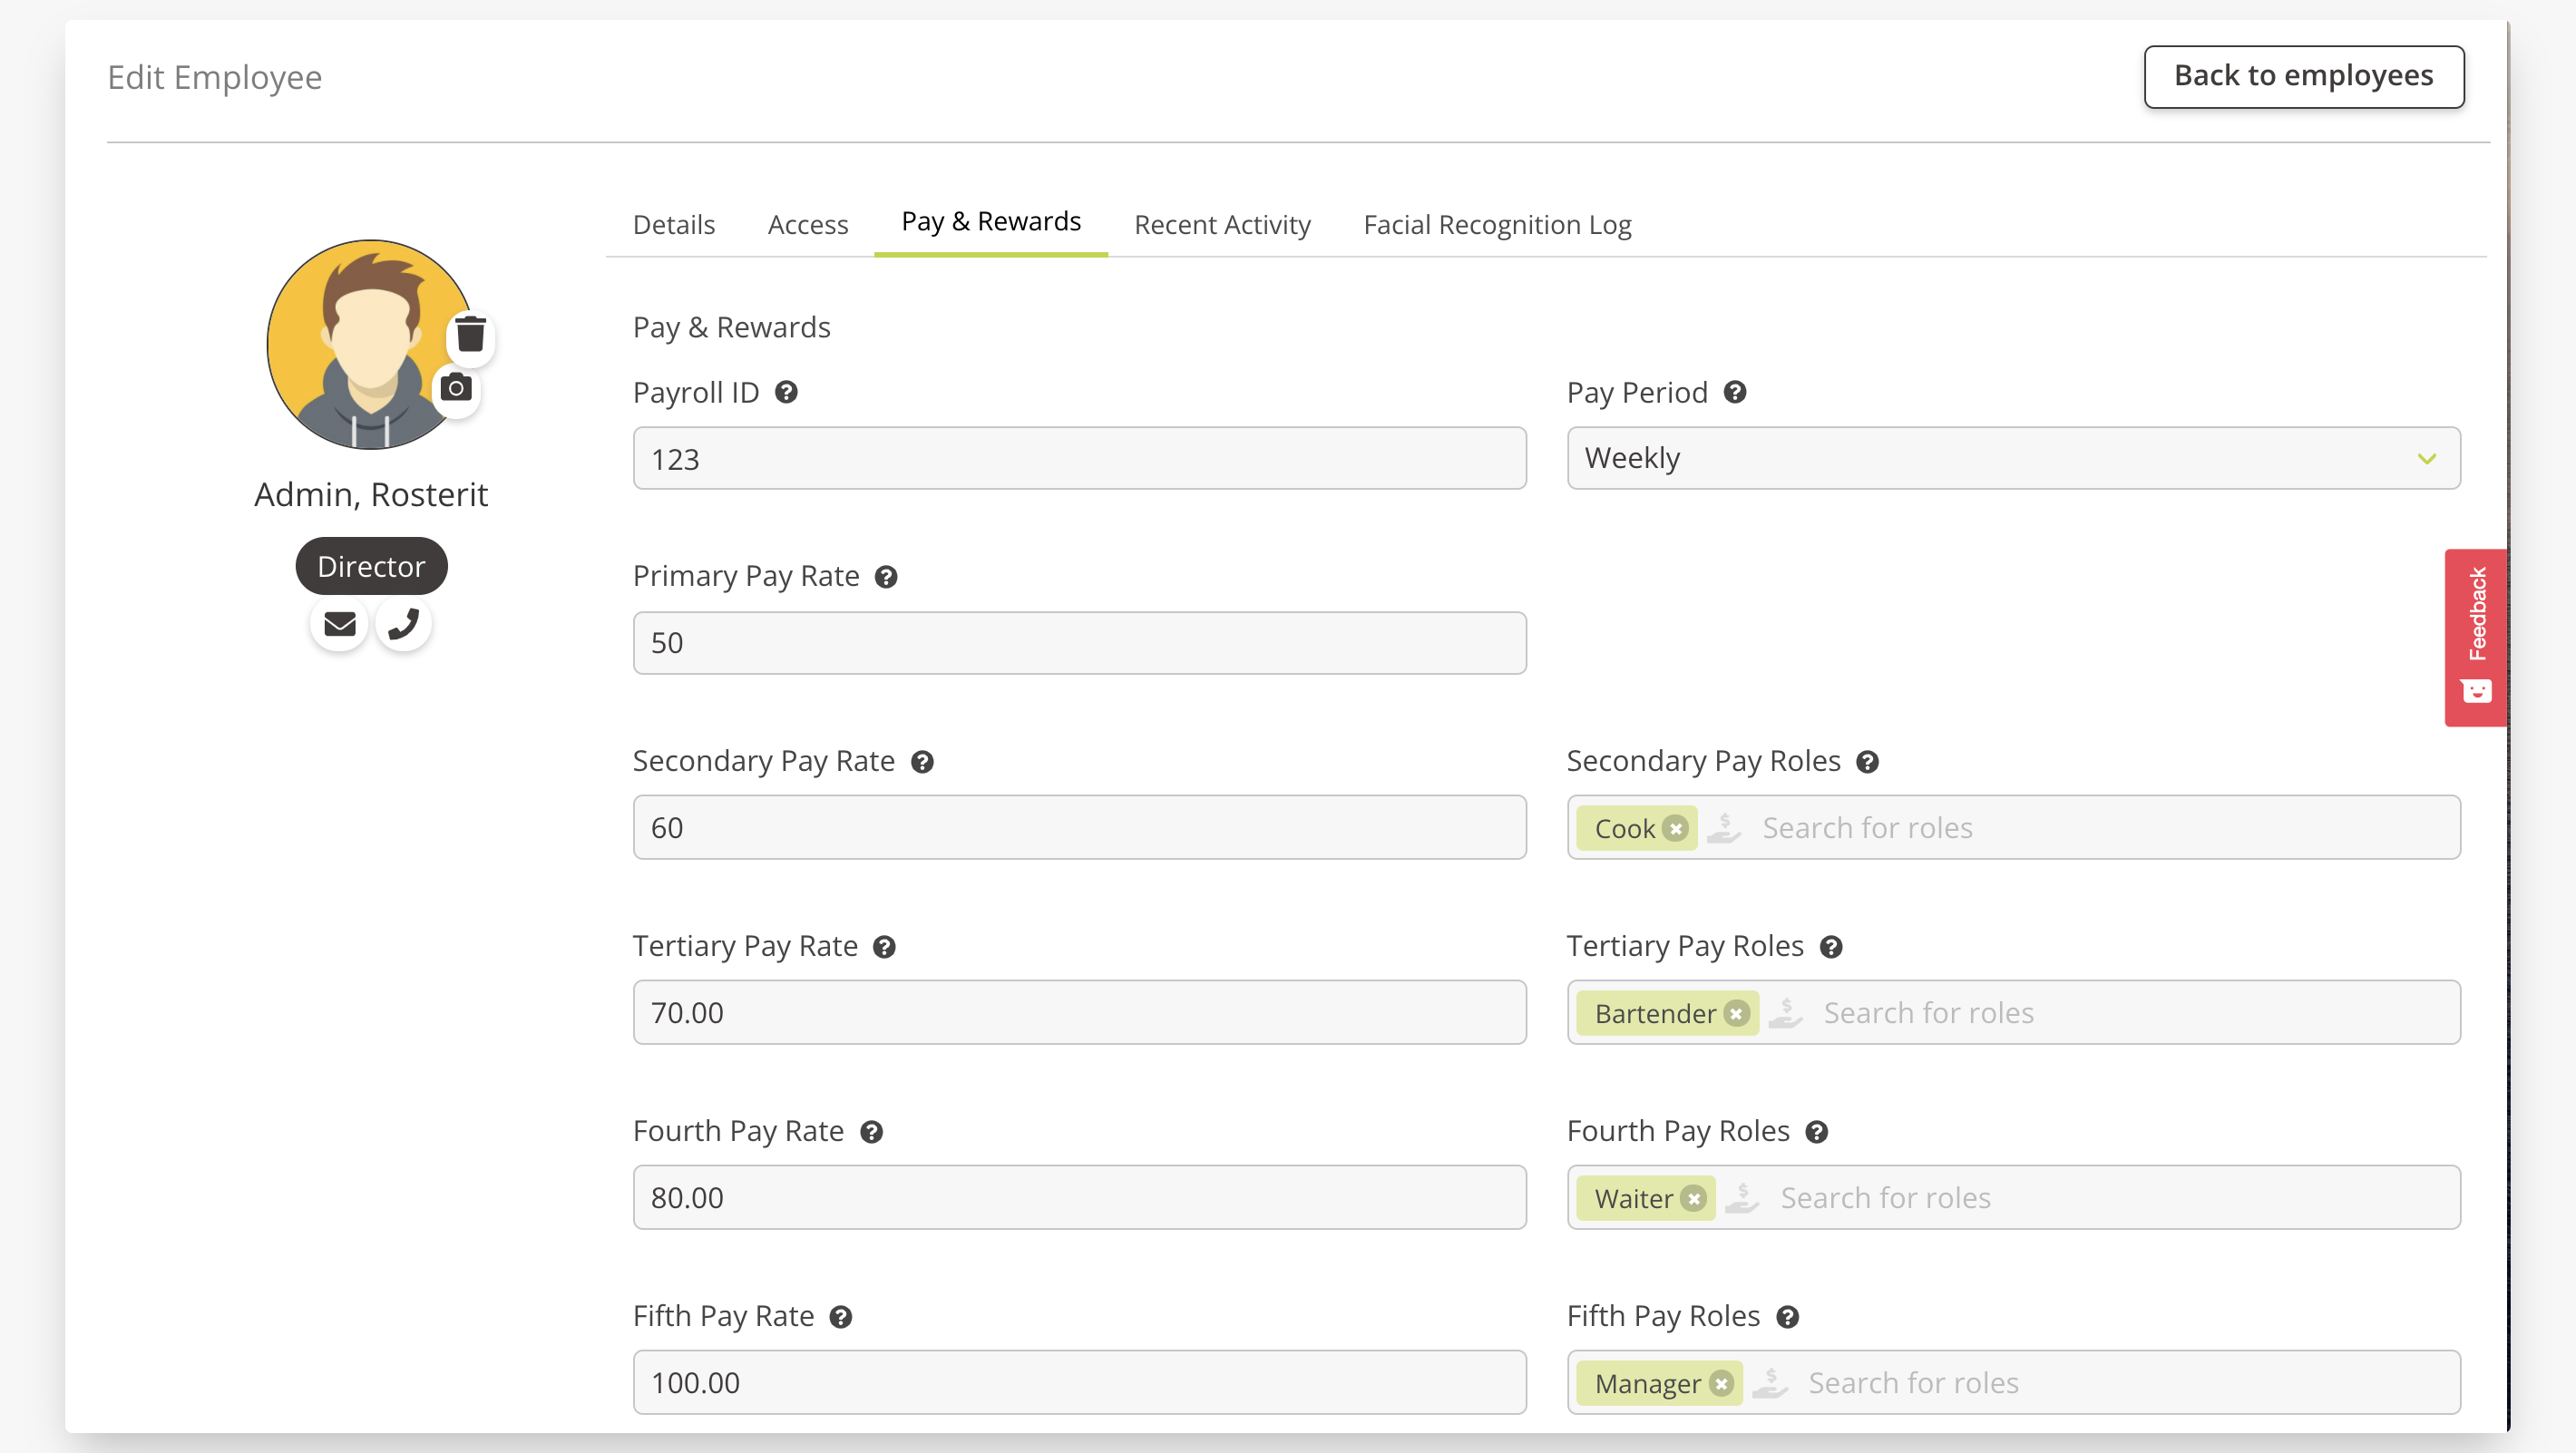
This includes:
- Payroll ID – Entering the employee’s Payroll ID to exactly match your payroll system.
- Pay period – Select which pay period the employee belongs to. This must be selected for the employee to appear on the timesheet.
- Pay Rates – Enter the employee’s pay rates to specify which role gets which Pay Rate, with up to five Pay Rates available. These Pay Rates correspond to the Pay Elements/Payroll Cost Codes on the Company Settings page. Pay Rates are optional and are required if you wish to have costing reports.
- Default Leave Job Code – To specify a default Job Code for Leave, enter it here to override the default Job Code in your Company Settings. A Job Code needs to be created from the Jobs page in order to activate this.
- If the employee has an unpaid break, specify the length of the break.
- Paid Meal Break – Specify whether the employee gets paid for a meal break. This must be specified for each employee.
- Max Hours – Restrict the number of hours the employee can work in a week.
- Overtime Hours – Specify the number of hours before overtime applies (e.g. 40 hours).
- Timesheet Source – Select the Timesheet Source. See Time & Attendance training manual for details.
-
Leave Payout – Specify payout for sick leave, bereavement and day in lieu:
Roster – employees get paid for what they were supposed to be rostered on.
Fixed – employees get paid a fixed specified amount of hours - Leave Type – Select the Leave Type. See Time & Attendance training manual for details. Number of days worked per week, Contracted hours, and Standard work days are required fields for Standard Leave type only.
- Reset Password button – Administrators are able to reset employees passwords by clicking on the Reset Password button.
Note: The Pay Period must be selected for the employee to appear on the timesheet.
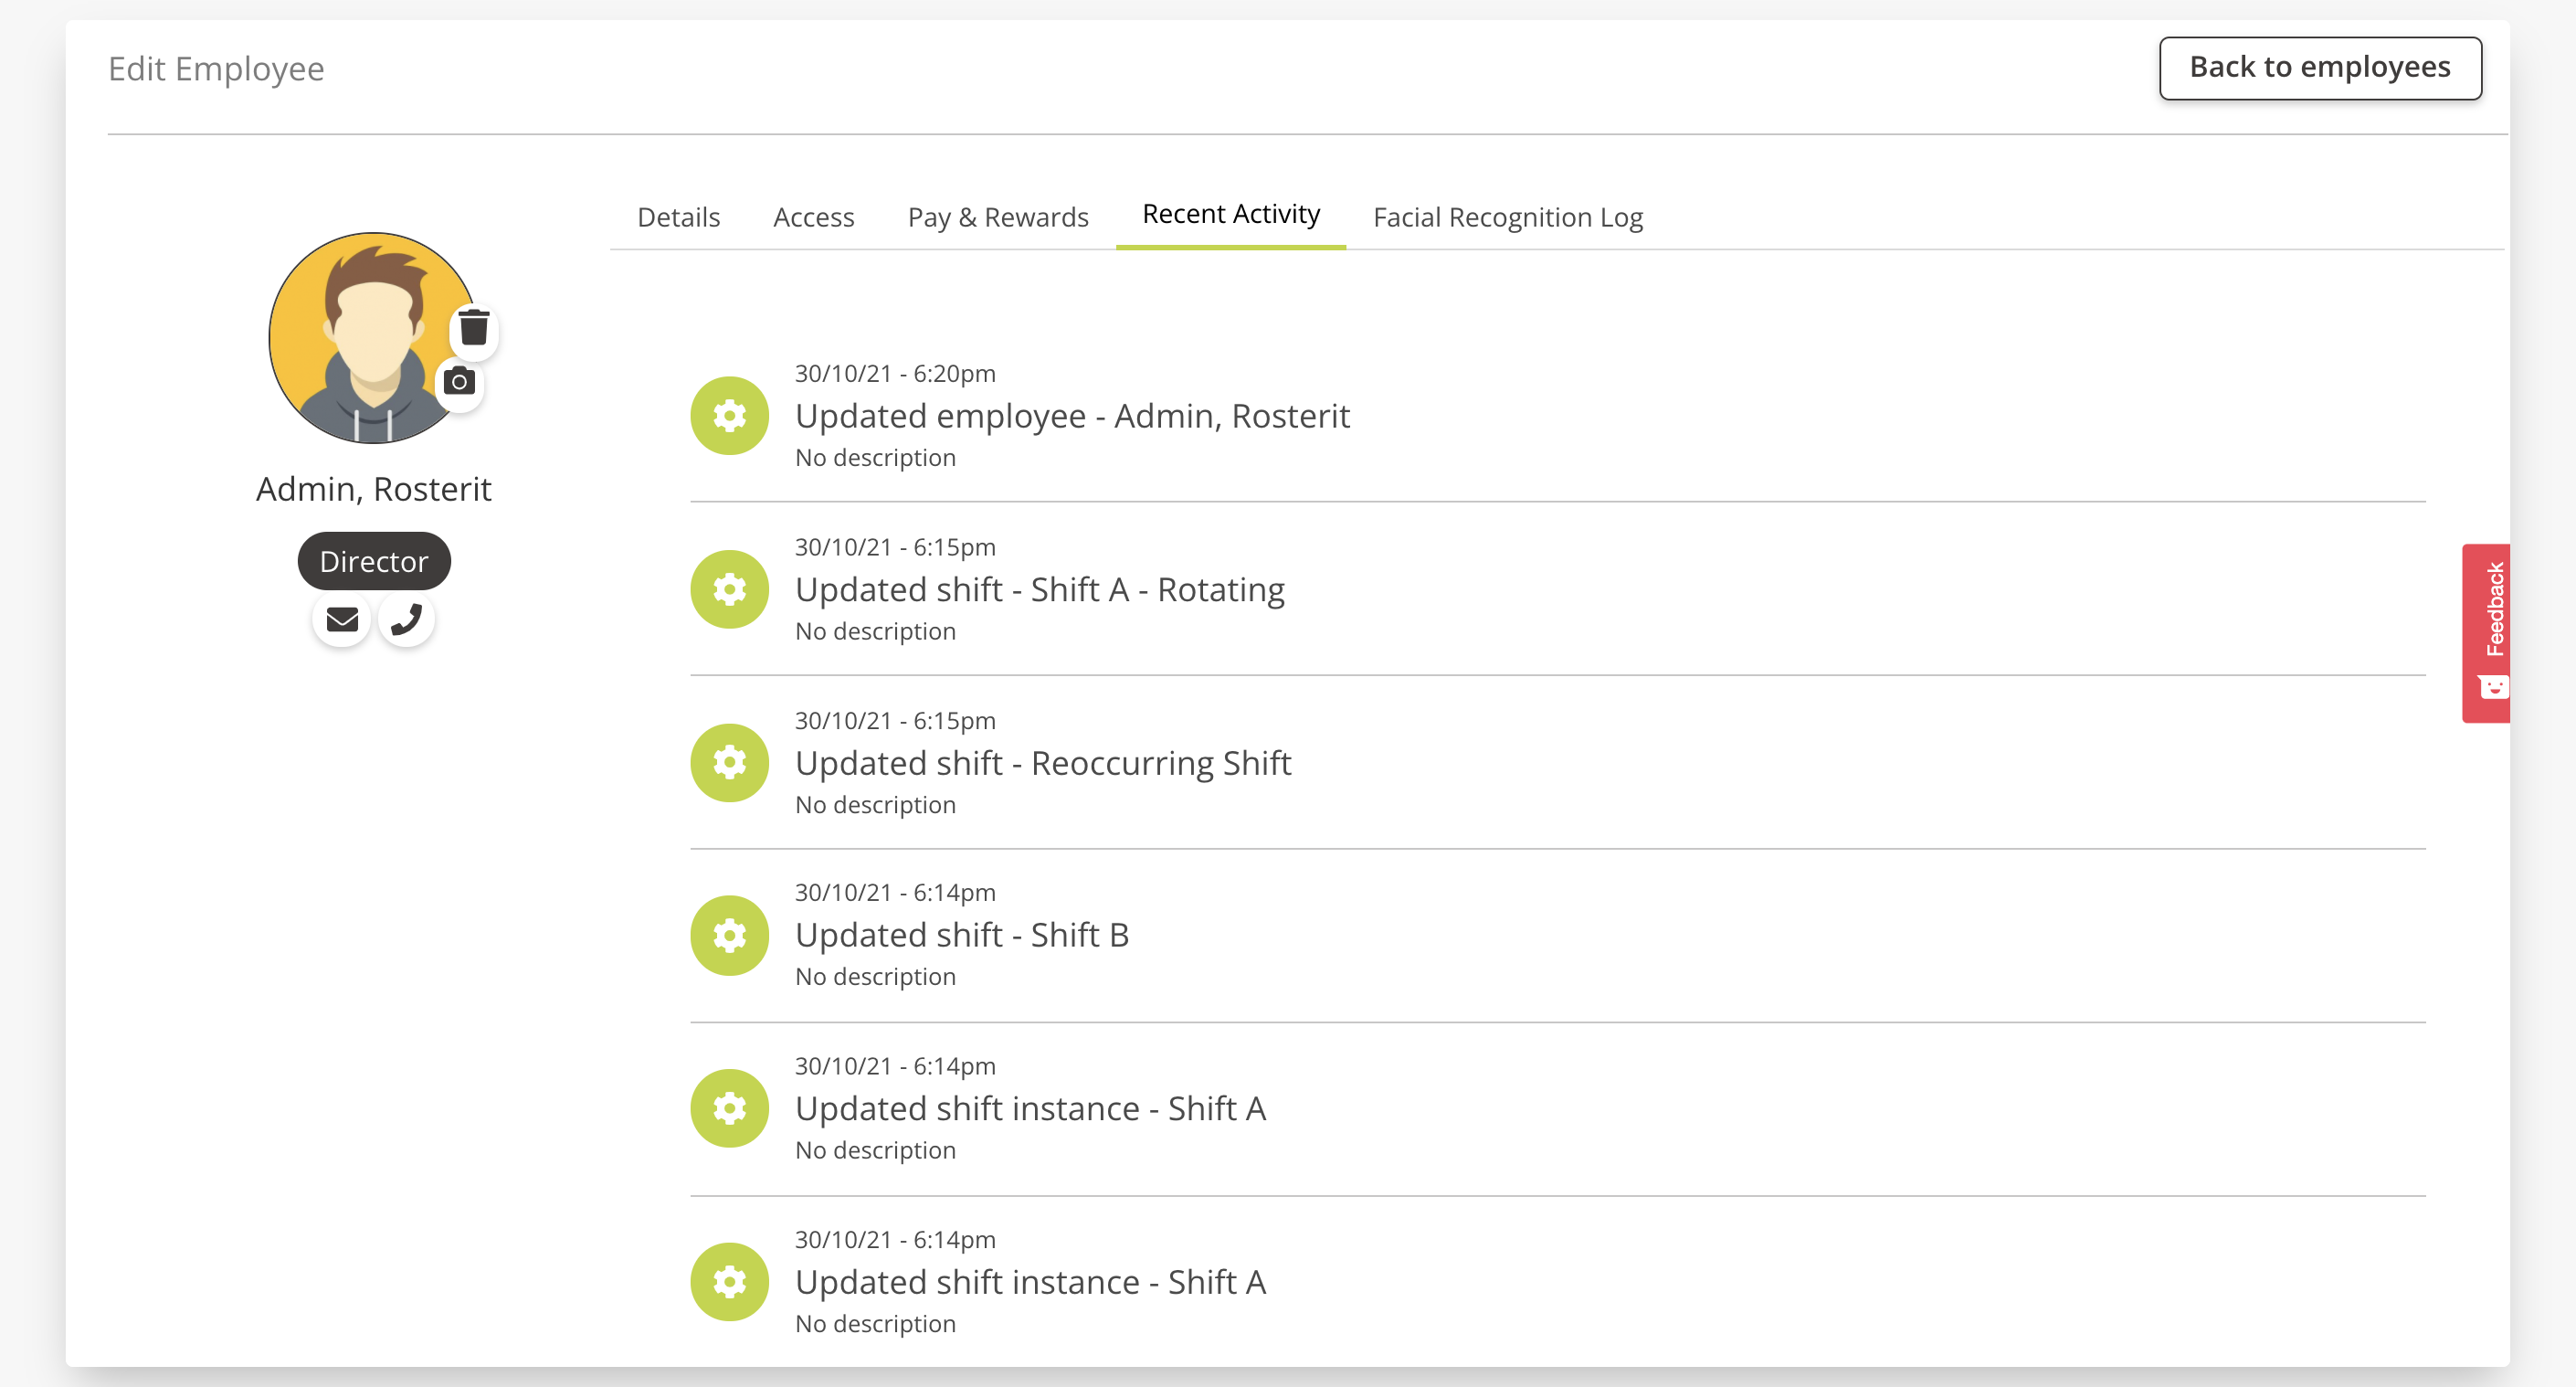
Once you have begun using Rosterit, you can view the recent activity of specific employees by navigating to this tab.
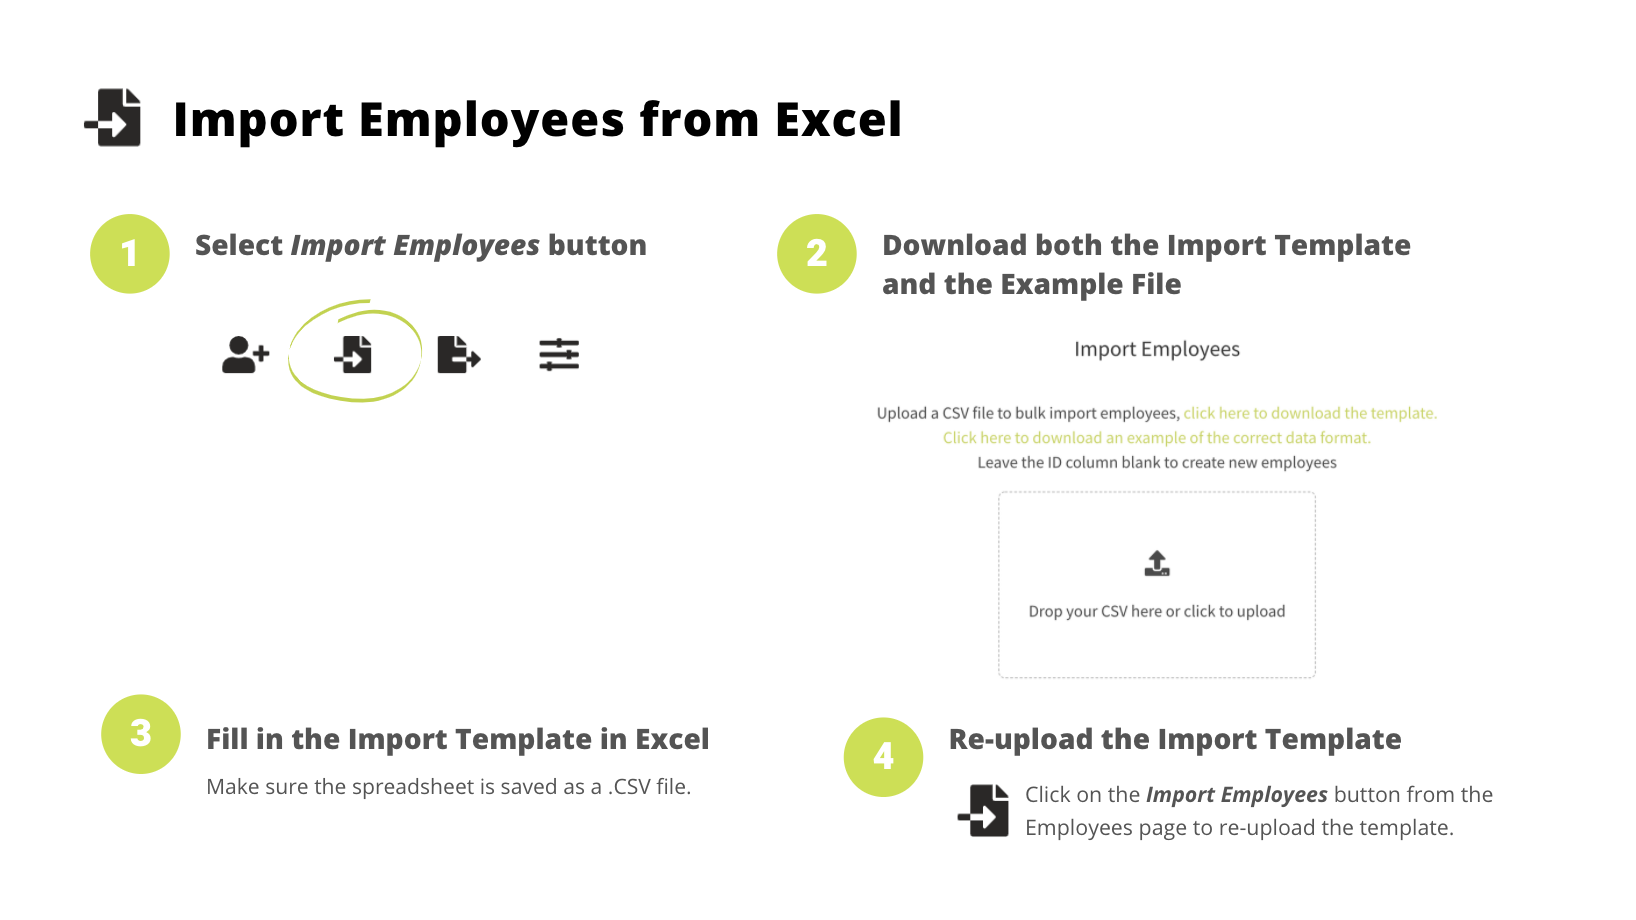
To upload employee details automatically, download the Employee Upload.csv template. Then, fill in each column with as much information as required, ensuring any system fields are spelled correctly (e.g. departments or roles). If an employee has multiple roles, use a comma with no space to add more than one.